Django for Beginners: Building Your First Web App
Django for Beginners: Building Your First Web App
Introduction to Django
In the vast and diverse landscape of web development, choosing the right framework can significantly impact the efficiency, scalability, and maintainability of your application. For Python developers, Django stands out as a high-level, open-source web framework that encourages rapid development and clean, pragmatic design. Often referred to as a “batteries-included” framework, Django provides a comprehensive set of tools and features out-of-the-box, allowing developers to focus on building unique application logic rather than reinventing common functionalities.
Django was created in 2003 by a web team at the Lawrence Journal-World newspaper in Kansas, USA, and was publicly released under a BSD license in July 2005. Its primary goal was to simplify the creation of complex, database-driven websites, emphasizing the principle of “Don’t Repeat Yourself” (DRY). This philosophy promotes code reusability and reduces redundancy, leading to more efficient and less error-prone development. Django handles much of the tedious work of web development, such as user authentication, content administration, site maps, and RSS feeds, allowing developers to concentrate on the core features of their applications.
What makes Django particularly appealing is its robust ecosystem and its adherence to the Model-View-Template (MVT) architectural pattern, a variation of the more common Model-View-Controller (MVC). This pattern promotes a clear separation of concerns, making applications easier to understand, develop, and maintain. Django is widely used by major organizations like Instagram, Spotify, and NASA, a testament to its power, scalability, and reliability. This article will serve as a beginner-friendly guide to Django, covering its core concepts, walking through the steps of setting up your first web application, and providing practical code examples to get you started on your journey to building powerful web solutions with Python.
Core Concepts: MVT Architecture, Models, Views, and Templates
To effectively build applications with Django, it’s crucial to understand its fundamental architectural pattern and the role of its key components. Django follows the Model-View-Template (MVT) architecture, which is a slightly different interpretation of the Model-View-Controller (MVC) pattern.
MVT Architecture Overview
In Django’s MVT architecture:
- Model: The Model is the data access layer. It defines the structure of your data, typically mapping to a database table. It handles the logic for storing, retrieving, updating, and deleting data. Django provides an Object-Relational Mapper (ORM) that allows you to interact with your database using Python objects, abstracting away the complexities of SQL.
- View: The View is the business logic layer. It receives a web request, interacts with the Model to retrieve or manipulate data, and then passes that data to a Template for rendering. A View is essentially a Python function or class that takes an HTTP request and returns an HTTP response. It decides what data should be presented to the user.
- Template: The Template is the presentation layer. It defines how the data received from the View should be displayed to the user. Django’s templating language allows you to embed Python-like logic within HTML to dynamically generate web pages. Templates are responsible for the user interface.
In a typical request-response cycle in Django:
- A user sends a request to the Django application.
- The URL dispatcher (part of Django’s core) maps the URL to a specific View.
- The View processes the request, interacts with the Model to fetch or modify data, and prepares the context data.
- The View then renders a Template with the prepared data.
- The rendered HTML is sent back as an HTTP response to the user’s browser.
This clear separation of concerns makes Django applications highly modular and easier to manage, especially for large projects.
Models: Defining Your Data Structure
Django Models are Python classes that define the structure of your application’s data. Each model typically maps to a table in your database, and each attribute of the model represents a column in that table. Django’s ORM (Object-Relational Mapper) allows you to interact with your database using Python objects, eliminating the need to write raw SQL queries. This makes database operations more intuitive and less error-prone.
Example Model (myapp/models.py):
from django.db import models

class Post(models.Model):
    title = models.CharField(max_length=200)
    content = models.TextField()
    pub_date = models.DateTimeField(auto_now_add=True)
    updated_date = models.DateTimeField(auto_now=True)

    def __str__(self):
        return self.title
In this example:
Postis a model that will create a table namedmyapp_postin the database.titleis a character field with a maximum length of 200 characters.contentis a text field for longer text.pub_dateautomatically sets the creation timestamp.updated_dateautomatically updates the timestamp on every save.__str__method provides a human-readable representation of the object.
After defining models, you need to create database migrations and apply them:
python manage.py makemigrations
python manage.py migrate
Views: Handling Logic and Data Flow
Django Views are Python functions or classes that receive web requests and return web responses. They contain the business logic of your application. A view’s primary responsibility is to fetch data from the models, process it, and then pass it to a template for rendering.
Example View (myapp/views.py):
from django.shortcuts import render, get_object_or_404
from .models import Post

def post_list(request):
    posts = Post.objects.all().order_by("-pub_date")
    return render(request, "myapp/post_list.html", {"posts": posts})

def post_detail(request, pk):
    post = get_object_or_404(Post, pk=pk)
    return render(request, "myapp/post_detail.html", {"post": post})
Here:
post_listfetches allPostobjects, orders them by publication date, and renderspost_list.htmlwith thepostsdata.post_detailfetches a singlePostby its primary key (pk) and renderspost_detail.html.
Templates: Presenting Data to the User
Django Templates are used to generate HTML dynamically. They combine static HTML with Django’s templating language, which allows you to embed variables, loops, and conditional statements. Templates are responsible for the user-facing part of your application.
Example Template (myapp/templates/myapp/post_list.html):
<!DOCTYPE html>
<html lang="en">
<head>
    <meta charset="UTF-8">
    <meta name="viewport" content="width=device-width, initial-scale=1.0">
    <title>My Blog</title>
</head>
<body>
    <h1>Blog Posts</h1>
    {% for post in posts %}
        <article>
            <h2><a href="{% url 'post_detail' pk=post.pk %}">{{ post.title }}</a></h2>
            <p>{{ post.content|truncatechars:200 }}</p>
            <small>Published on: {{ post.pub_date|date:"F j, Y" }}</small>
        </article>
    {% empty %}
        <p>No posts yet.</p>
    {% endfor %}
</body>
</html>
This template iterates through the posts list passed from the view, displaying each post’s title, a truncated version of its content, and its publication date. It also includes a link to the detail page for each post using Django’s url template tag.
Setting Up Your First Django Project
Let’s walk through the process of setting up a basic Django project and creating your first web application.
Prerequisites
- Python: Ensure you have Python installed (version 3.8 or higher is recommended).
- pip: Python’s package installer, usually comes with Python.
Step 1: Install Django
It’s best practice to work within a virtual environment to manage project dependencies. Create and activate a virtual environment:
python -m venv myenv
source myenv/bin/activate  # On Windows: myenv\Scripts\activate
Now, install Django:
pip install DjangoStep 2: Create a New Django Project
Once Django is installed, you can create a new project. A project is a collection of settings and applications that make up a particular website.
django-admin startproject myproject .This command creates a myproject directory (or uses the current directory if . is used) with the basic project structure:
myproject/
├── manage.py
├── myproject/
│   ├── __init__.py
│   ├── asgi.py
│   ├── settings.py
│   ├── urls.py
│   └── wsgi.py
└── db.sqlite3 (after first migrate)manage.py: A command-line utility for interacting with your Django project.myproject/settings.py: Contains project settings like database configuration, installed apps, and static files.myproject/urls.py: The main URL configuration for your project.
Step 3: Create a Django App
In Django, an “app” is a self-contained module that does one thing. A project can contain multiple apps. For our blog, let’s create an app named blog:
python manage.py startapp blogThis creates a blog directory with its own set of files:
blog/
├── migrations/
├── __init__.py
├── admin.py
├── apps.py
├── models.py
├── tests.py
└── views.py
Step 4: Register the App
For Django to recognize your new app, you need to add it to the INSTALLED_APPS list in myproject/settings.py:
# myproject/settings.py

INSTALLED_APPS = [
    'django.contrib.admin',
    'django.contrib.auth',
    'django.contrib.contenttypes',
    'django.contrib.sessions',
    'django.contrib.messages',
    'django.contrib.staticfiles',
    'blog',  # Add your app here
]
Step 5: Define a Model
Open blog/models.py and define a simple Post model:
# blog/models.py

from django.db import models

class Post(models.Model):
    title = models.CharField(max_length=200)
    content = models.TextField()
    pub_date = models.DateTimeField(auto_now_add=True)

    def __str__(self):
        return self.title
Step 6: Create and Apply Migrations
Whenever you make changes to your models, you need to create and apply migrations to update your database schema:
python manage.py makemigrations blog
python manage.py migrate
Step 7: Create an Admin User
To manage your blog posts, create a superuser for the Django admin interface:
python manage.py createsuperuserFollow the prompts to create a username, email, and password.
Step 8: Register Model in Admin
To make your Post model accessible in the Django admin, open blog/admin.py and register it:
# blog/admin.py

from django.contrib import admin
from .models import Post

admin.site.register(Post)
Step 9: Define Views
Open blog/views.py and define a view to display a list of posts:
# blog/views.py

from django.shortcuts import render
from .models import Post

def post_list(request):
    posts = Post.objects.all().order_by("-pub_date")
    return render(request, "blog/post_list.html", {"posts": posts})
Step 10: Create Templates
Create a templates directory inside your blog app, and inside that, another blog directory (this is a common Django convention to prevent template name collisions). Then create post_list.html inside blog/templates/blog/:
<!-- blog/templates/blog/post_list.html -->

<!DOCTYPE html>
<html lang="en">
<head>
    <meta charset="UTF-8">
    <meta name="viewport" content="width=device-width, initial-scale=1.0">
    <title>My Django Blog</title>
</head>
<body>
    <h1>Blog Posts</h1>
    {% for post in posts %}
        <article>
            <h2><a href="#">{{ post.title }}</a></h2>
            <p>{{ post.content|truncatechars:200 }}</p>
            <small>Published on: {{ post.pub_date|date:"F j, Y" }}</small>
        </article>
    {% empty %}
        <p>No posts yet.</p>
    {% endfor %}
</body>
</html>
Step 11: Configure URLs
First, create a urls.py file inside your blog app:
# blog/urls.py

from django.urls import path
from . import views

urlpatterns = [
    path('', views.post_list, name='post_list'),
]
Then, include your app’s URLs in the main project’s urls.py (myproject/urls.py):
# myproject/urls.py

from django.contrib import admin
from django.urls import path, include

urlpatterns = [
    path('admin/', admin.site.urls),
    path('blog/', include('blog.urls')), # Include your app's URLs
]
Step 12: Run the Development Server
Finally, run the Django development server:
python manage.py runserverOpen your browser and navigate to http://127.0.0.1:8000/admin/. Log in with the superuser credentials you created. You should see your Posts model listed. Click on it and add a few blog posts. Then, navigate to http://127.0.0.1:8000/blog/ to see your blog post list.
This completes the basic setup of your first Django web application. You have a working blog where you can add posts via the admin interface and view them on the frontend.
Advanced Django Concepts and Best Practices
As you become more comfortable with Django, you’ll encounter more advanced concepts and best practices that are crucial for building robust, scalable, and secure applications.
URL Routing and Namespacing
Django’s URL dispatcher is powerful. For larger projects, it’s good practice to namespace your app URLs to avoid conflicts, especially when including multiple apps in a single project. This is done by adding app_name in your app’s urls.py and using {% url 'app_name:view_name' %} in templates.
# blog/urls.py
app_name = 'blog'
urlpatterns = [
    path('', views.post_list, name='post_list'),
    path('<int:pk>/', views.post_detail, name='post_detail'),
]
Then, in your template:
<a href="{% url 'blog:post_detail' pk=post.pk %}">{{ post.title }}</a>Forms
Django provides a powerful forms framework that handles form rendering, validation, and processing. Instead of manually handling form data, you define Form classes that map to your models or custom data structures. This simplifies user input handling and ensures data integrity.
# blog/forms.py
from django import forms
from .models import Post

class PostForm(forms.ModelForm):
    class Meta:
        model = Post
        fields = ['title', 'content']
Class-Based Views (CBVs)
While function-based views are simple for basic tasks, Django’s Class-Based Views (CBVs) offer a more reusable and extensible way to write views, especially for common patterns like displaying lists, details, or handling forms. They provide mixins and generic views that abstract away much of the boilerplate code.
# blog/views.py
from django.views.generic import ListView, DetailView
from .models import Post

class PostListView(ListView):
    model = Post
    template_name = 'blog/post_list.html'
    context_object_name = 'posts'
    ordering = ['-pub_date']

class PostDetailView(DetailView):
    model = Post
    template_name = 'blog/post_detail.html'
    context_object_name = 'post'
And in blog/urls.py:
# blog/urls.py
from django.urls import path
from .views import PostListView, PostDetailView

app_name = 'blog'
urlpatterns = [
    path('', PostListView.as_view(), name='post_list'),
    path('<int:pk>/', PostDetailView.as_view(), name='post_detail'),
]
Static Files and Media Files
Django has a robust system for managing static files (CSS, JavaScript, images) and media files (user-uploaded content). You configure STATIC_URL, STATICFILES_DIRS, and MEDIA_URL, MEDIA_ROOT in settings.py and use {% static 'path/to/file' %} and {% media 'path/to/file' %} template tags.
Security
Django is built with security in mind and includes protections against many common web vulnerabilities, such as XSS, CSRF, SQL injection, and clickjacking. However, developers must still follow best practices, such as:
- Always validate and sanitize user input.
- Use Django’s built-in authentication system.
- Keep
SECRET_KEYsecure and out of version control. - Regularly update Django and its dependencies.
Testing
Django encourages testing and provides a powerful testing framework built on Python’s unittest module. Writing tests for your models, views, and forms is crucial for ensuring the reliability and correctness of your application.
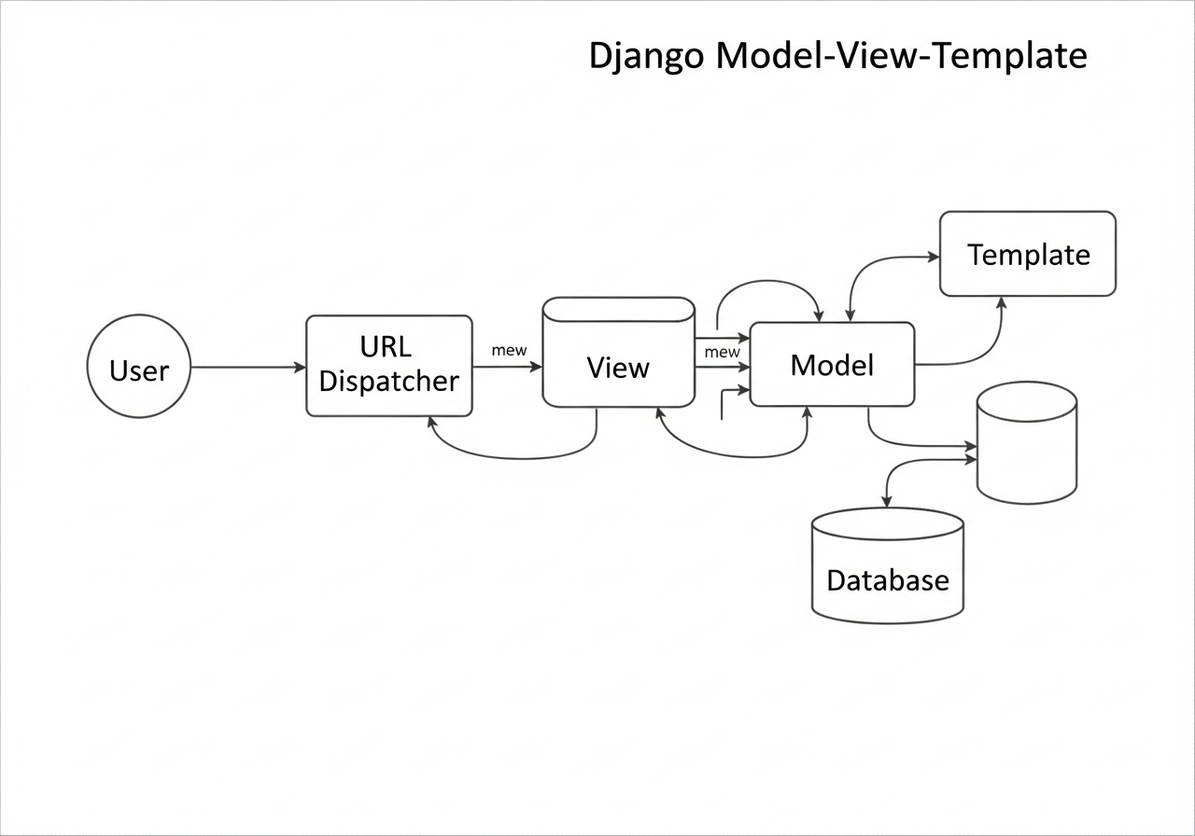
Diagram: Django Model-View-Template (MVT) Architecture
To visually summarize the flow of data and interactions within a Django application, consider the following diagram:
This diagram illustrates the core components of Django’s MVT architecture and their interactions. A user’s request first hits the URL Dispatcher, which routes it to the appropriate View. The View then interacts with the Model to retrieve or manipulate data from the Database. Finally, the View renders a Template with the processed data, which is then sent back to the user as an HTML response. The arrows clearly show the flow, emphasizing the separation of concerns and the roles of each component in handling a web request.
Conclusion: Building Powerful Web Applications with Django
Django stands as a testament to the power and elegance of Python in web development. As a “batteries-included” framework, it provides a robust and comprehensive toolkit that significantly accelerates the development of complex, database-driven websites. Its adherence to the Model-View-Template (MVT) architectural pattern promotes a clean, modular, and maintainable codebase, making it an excellent choice for projects of all sizes, from small personal blogs to large-scale enterprise applications.
This guide has introduced you to the fundamental concepts of Django, including its MVT architecture, the roles of Models, Views, and Templates, and provided a step-by-step walkthrough for setting up your first Django project and app. You’ve learned how to define data structures with models, handle business logic with views, and present dynamic content with templates, all while leveraging Django’s powerful ORM and admin interface.
The journey with Django, however, extends far beyond these basics. The framework offers a rich set of features for handling forms, user authentication, static and media files, and a sophisticated testing framework. Its vibrant community and extensive documentation ensure that you’ll always find resources and support as you delve deeper into more advanced topics like Class-Based Views, custom template tags, REST APIs with Django REST Framework, and deployment strategies.
For beginners, Django provides a structured yet flexible environment to learn web development best practices. Its emphasis on convention over configuration, coupled with its built-in security features, allows developers to build secure and scalable applications with confidence. By mastering Django, you gain a powerful skill set that is highly sought after in the industry, enabling you to transform your ideas into functional, high-quality web applications. Embrace the Django philosophy, and you’ll discover a highly productive and enjoyable path to building the next generation of web solutions.
Discussion
Loading comments...