Getting Started with React
Getting Started with React: A Beginner’s Guide
Introduction to React
In the dynamic world of web development, frameworks and libraries play a pivotal role in streamlining the creation of complex user interfaces. Among these, React, a JavaScript library for building user interfaces, stands out as one of the most popular and widely adopted technologies. Developed and maintained by Facebook (now Meta), React has revolutionized how developers approach frontend development by introducing a component-based architecture and a declarative programming style.
Before React, building interactive web applications often involved direct manipulation of the Document Object Model (DOM), which could quickly become cumbersome and inefficient for large-scale applications. React addresses this challenge by introducing the concept of a Virtual DOM. Instead of directly updating the browser’s DOM, React first updates a lightweight copy of the DOM in memory. It then efficiently calculates the differences between the Virtual DOM and the real DOM, and only updates the necessary parts of the actual DOM. This process, known as reconciliation, significantly improves performance and simplifies UI updates, making applications faster and more responsive.
React’s popularity stems from several key features: its component-based structure, which promotes reusability and modularity; its declarative nature, allowing developers to describe what the UI should look like rather than how to achieve it; and its robust ecosystem, supported by a vast community and a wealth of tools and libraries. This article will serve as a comprehensive guide for beginners, covering the fundamental concepts of React, walking through the process of setting up a development environment, and providing practical examples to kickstart your journey into building modern web applications with React.
Core Concepts of React
To effectively build applications with React, it’s essential to understand its core concepts. These foundational ideas underpin how React works and how you should structure your applications.
1. Components
At the heart of React is the concept of a component. A component is an independent, reusable piece of UI. Think of a web page as being composed of many smaller, self-contained components, much like LEGO bricks. Each component has its own logic and appearance, and they can be nested within each other to build complex UIs. Components make it easier to manage and maintain large applications, as you can develop and test each part in isolation.
React components can be broadly categorized into two types:
-
Function Components: These are simple JavaScript functions that accept props (properties) as an argument and return React elements. With the introduction of Hooks in React 16.8, function components can now manage state and side effects, making them the preferred way to write components in modern React.
// Example of a Function Component function WelcomeMessage(props) { return <h1>Hello, {props.name}!</h1>; } -
Class Components: These are ES6 classes that extend
React.Componentand have arender()method that returns React elements. While still supported, they are less commonly used in new React development due to the advantages offered by function components and Hooks.// Example of a Class Component import React from 'react'; class WelcomeMessageClass extends React.Component { render() { return <h1>Hello, {this.props.name}!</h1>; } }
2. JSX (JavaScript XML)
JSX is a syntax extension for JavaScript that allows you to write HTML-like code directly within your JavaScript files. It’s not a new language but a syntactic sugar that gets transpiled into regular JavaScript calls. JSX makes it easier to describe the UI structure and combine it with JavaScript logic.
// Without JSX
const elementWithoutJSX = React.createElement(
  'h1',
  null,
  'Hello, world!'
);

// With JSX
const elementWithJSX = <h1>Hello, world!</h1>;
While JSX looks like HTML, it’s important to remember that it’s JavaScript. For example, you use className instead of class for CSS classes, and you can embed JavaScript expressions within curly braces {}.
3. Props (Properties)
Props (short for properties) are a way of passing data from a parent component to a child component. They are read-only, meaning a child component cannot modify the props it receives from its parent. This unidirectional data flow makes React applications predictable and easier to debug. Props are similar to function arguments or HTML attributes.
// Parent Component
function App() {
  return <WelcomeMessage name="Alice" />;
}

// Child Component (WelcomeMessage from above)
function WelcomeMessage(props) {
  return <h1>Hello, {props.name}!</h1>;
}
Here, name="Alice" is passed as a prop to the WelcomeMessage component.
4. State
While props allow data to flow from parent to child, state is used to manage data that is internal to a component and can change over time. State is mutable, and when a component’s state changes, React automatically re-renders the component and its children to reflect the new state. State is typically managed using the useState Hook in function components.
import React, { useState } from 'react';

function Counter() {
  const [count, setCount] = useState(0); // Initialize state with 0

  return (
    <div>
      <p>You clicked {count} times</p>
      <button onClick={() => setCount(count + 1)}>
        Click me
      </button>
    </div>
  );
}
In this Counter component, count is a state variable, and setCount is the function used to update it. When setCount is called, React re-renders the component with the new count value.
5. Virtual DOM
The Virtual DOM is a lightweight, in-memory representation of the actual DOM. When a component’s state or props change, React first updates the Virtual DOM. It then compares the updated Virtual DOM with a snapshot of the previous Virtual DOM to identify the minimal set of changes required. Finally, it applies only these necessary changes to the real DOM. This efficient reconciliation process minimizes direct DOM manipulations, which are typically slow, leading to faster and smoother UI updates.
Setting Up Your First React Project
To begin building React applications, you’ll need a development environment. The easiest way to get started is by using a toolchain that sets up a modern React project with no configuration. The React team recommends using Vite or Create React App for new single-page applications.
Option 1: Using Vite (Recommended for new projects)
Vite is a fast and lightweight build tool that provides an excellent development experience for modern web projects, including React. It offers instant server start and lightning-fast Hot Module Replacement (HMR).
Prerequisites: Ensure you have Node.js (version 14.18+, 16+) and npm (or yarn/pnpm) installed.
-
Create a new Vite project:
Open your terminal and run:
npm create vite@latest my-react-app -- --template reactThis command will create a new directory named
my-react-appand set up a basic React project inside it. -
Navigate into the project directory:
cd my-react-app -
Install dependencies:
npm install -
Start the development server:
npm run devVite will start a development server, usually at
http://localhost:5173. Open this URL in your browser, and you should see the default React application.
Option 2: Using Create React App (CRA)
Create React App is an officially supported way to create single-page React applications. It provides a modern build setup with no configuration.
Prerequisites: Ensure you have Node.js (version 14.0.0 or higher) and npm (version 5.6 or higher) installed.
-
Create a new React project:
Open your terminal and run:
npx create-react-app my-react-appThis command will create a new directory named
my-react-appand set up a basic React project inside it.npxis a package runner tool that comes with npm 5.2+. -
Navigate into the project directory:
cd my-react-app -
Start the development server:
npm startThis will start the development server, usually at
http://localhost:3000. Open this URL in your browser, and you should see the default React application.
Building Your First React Component: A Simple Counter
Let’s build a simple interactive counter component to solidify your understanding of state and event handling in React.
Step 1: Open src/App.jsx (or src/App.js)
In your my-react-app project, open the src/App.jsx (or src/App.js if you used CRA without TypeScript) file. You’ll see some boilerplate code. Replace its content with the following:
import React, { useState } from 'react';
import './App.css'; // Assuming you have an App.css for basic styling

function Counter() {
  // Declare a new state variable, which we'll call


\'count\'
  const [count, setCount] = useState(0);

  const increment = () => {
    setCount(count + 1);
  };

  const decrement = () => {
    setCount(count - 1);
  };

  return (
    <div className="counter-container">
      <h1>Simple Counter</h1>
      <p>Current Count: {count}</p>
      <button onClick={decrement}>Decrement</button>
      <button onClick={increment}>Increment</button>
    </div>
  );
}

export default Counter;
Step 2: Add Basic Styling (Optional)
If you have an App.css file, you can add some basic styling to make the counter look better:
.counter-container {
  font-family: Arial, sans-serif;
  text-align: center;
  margin-top: 50px;
}

.counter-container button {
  padding: 10px 20px;
  margin: 0 10px;
  font-size: 16px;
  cursor: pointer;
  border: none;
  border-radius: 5px;
  background-color: #007bff;
  color: white;
  transition: background-color 0.3s ease;
}

.counter-container button:hover {
  background-color: #0056b3;
}

.counter-container p {
  font-size: 24px;
  font-weight: bold;
}
Explanation of the Counter Component
useState(0): This is a React Hook that allows function components to have state. It returns an array with two elements: the current state value (count) and a function to update it (setCount). We initializecountto0.incrementanddecrementfunctions: These functions update thecountstate usingsetCount. WhensetCountis called, React re-renders theCountercomponent with the newcountvalue.onClick={decrement}andonClick={increment}: These are event handlers. When the buttons are clicked, the respective functions are called.{count}in JSX: This is how you embed JavaScript expressions (like ourcountstate variable) directly into your JSX.
Save the files, and your development server should automatically refresh. You should now see a simple counter with increment and decrement buttons. This example demonstrates the fundamental concepts of state management and event handling in React.
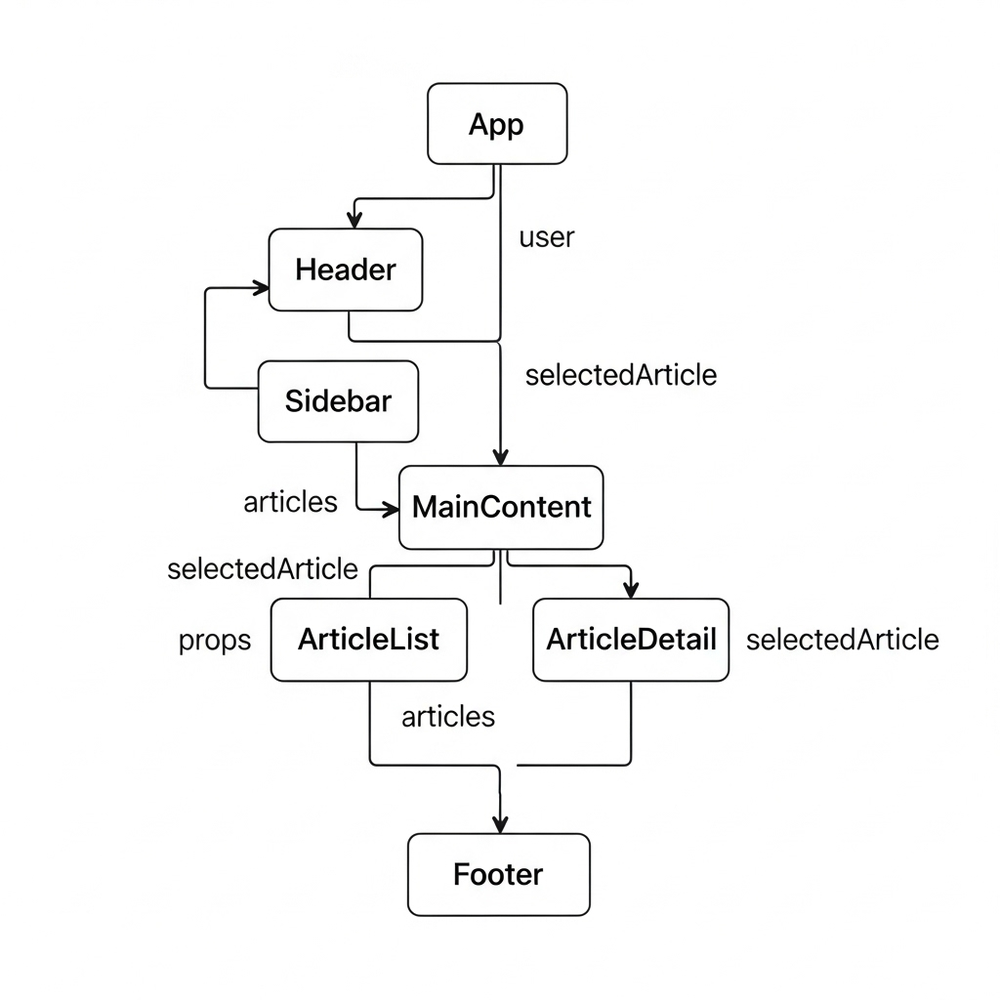
React Component Hierarchy: A Visual Representation
Understanding how components are organized and how data flows between them is crucial for building complex React applications. Consider the following diagram illustrating a typical component hierarchy:

This diagram shows a hierarchical structure starting from a root App component. It branches down to Header, Sidebar, MainContent, and Footer. MainContent further contains ArticleList and ArticleDetail. Arrows indicate parent-child relationships and how data (props like user, articles, selectedArticle) flows downwards from parent to child components. This visual helps in grasping the modular nature of React applications and the unidirectional data flow.
Conclusion: The Journey Continues with React
React has firmly established itself as a cornerstone of modern web development, empowering developers to build dynamic, high-performance, and maintainable user interfaces with remarkable efficiency. Its component-based architecture, declarative programming style, and efficient Virtual DOM reconciliation have transformed the landscape of frontend development, making it a preferred choice for a vast array of applications, from single-page applications to complex enterprise systems.
This guide has covered the fundamental concepts that form the bedrock of React development: components as reusable UI building blocks, JSX for writing HTML-like code in JavaScript, props for unidirectional data flow, and state for managing internal component data. We also explored how to set up a development environment using modern tools like Vite or Create React App and built a practical counter component to illustrate state management and event handling.
The journey into React is continuous. Beyond these fundamentals, there’s a rich ecosystem to explore, including:
- React Hooks: Advanced Hooks like
useEffect,useContext,useReducer, and custom Hooks for managing side effects, context, and complex state logic. - Routing: Libraries like React Router for handling navigation in single-page applications.
- State Management: More advanced state management solutions like Redux, Zustand, or Recoil for large-scale applications.
- Styling: Various approaches to styling components, including CSS Modules, Styled Components, and Tailwind CSS.
- Testing: Tools and methodologies for testing React components (e.g., Jest, React Testing Library).
- Performance Optimization: Techniques for optimizing React application performance, such as memoization (
React.memo,useMemo,useCallback) and lazy loading.
React’s vibrant community, extensive documentation, and continuous evolution ensure that it remains at the forefront of web development. By mastering its core principles and continually exploring its expanding capabilities, developers can unlock their full potential to create engaging, responsive, and robust web experiences. Whether you’re building a small personal project or a large-scale enterprise application, React provides a powerful and flexible foundation to bring your ideas to life.
Discussion
Loading comments...