Understanding Kubernetes: From Basics to Best Practices
Understanding Kubernetes: From Basics to Best Practices
Introduction to Container Orchestration
In the rapidly evolving landscape of software development, containers have emerged as a transformative technology, enabling developers to package applications and their dependencies into isolated, portable units. This portability ensures that applications run consistently across different environments, from a developer’s laptop to a production server. However, as the number of containers grows, managing them manually becomes a daunting task. This is where container orchestration comes into play.
Container orchestration is the automated process of managing, scaling, and deploying containerized applications. It involves a wide range of tasks, including container scheduling, load balancing, service discovery, health monitoring, and automated rollouts and rollbacks. Without an orchestration tool, developers would be responsible for manually starting, stopping, and monitoring each container, which is not only time-consuming but also prone to human error, especially in large-scale deployments.
Kubernetes, often abbreviated as K8s, has become the de facto standard for container orchestration. Originally developed by Google and now maintained by the Cloud Native Computing Foundation (CNCF), Kubernetes provides a powerful and extensible platform for automating the deployment, scaling, and management of containerized applications. It offers a rich set of features that address the complexities of running applications in a distributed environment, making it an indispensable tool for modern cloud-native development.
Core Concepts: Pods, Services, Deployments, and Namespaces
To effectively use Kubernetes, it’s essential to understand its fundamental building blocks. These core concepts form the foundation of how Kubernetes manages and orchestrates containerized applications.
Pods
A Pod is the smallest and simplest unit in the Kubernetes object model that you create or deploy. It represents a single instance of a running process in your cluster. A Pod can contain one or more containers, which are co-located and share the same network namespace, IP address, and storage volumes. This co-location allows containers within the same Pod to communicate with each other using localhost and to share data through mounted volumes. While it’s possible to run multiple containers in a single Pod, the most common use case is to have a one-to-one mapping between a Pod and a container.
Services
Pods are ephemeral, meaning they can be created and destroyed dynamically. This poses a challenge for maintaining stable communication with them. A Kubernetes Service is an abstraction that defines a logical set of Pods and a policy by which to access them. Services provide a stable endpoint (IP address and port) that can be used to access the Pods, even as they are created and destroyed. Kubernetes offers several types of Services, including:
- ClusterIP: Exposes the Service on a cluster-internal IP. This is the default type and is only reachable from within the cluster.
- NodePort: Exposes the Service on each Node’s IP at a static port. This makes the Service accessible from outside the cluster.
- LoadBalancer: Exposes the Service externally using a cloud provider’s load balancer. This is the standard way to expose services to the internet.
- ExternalName: Maps the Service to a CNAME record, allowing you to use an external service as if it were a part of your cluster.
Deployments
A Deployment is a higher-level abstraction that manages the lifecycle of Pods. It provides declarative updates for Pods and ReplicaSets (which ensure that a specified number of Pod replicas are running at any given time). With a Deployment, you can describe the desired state of your application, and Kubernetes will work to maintain that state. This includes creating and destroying Pods, rolling out updates to your application, and rolling back to a previous version if something goes wrong. Deployments are the recommended way to manage stateless applications in Kubernetes.
Namespaces
Namespaces are a way to divide cluster resources between multiple users or teams. They provide a scope for names, allowing you to have multiple resources with the same name as long as they are in different Namespaces. This is particularly useful in multi-tenant environments where you need to isolate resources and control access. By default, a Kubernetes cluster has a default Namespace, but you can create additional Namespaces to organize your applications and resources.
Setting up a Kubernetes Cluster: A Step-by-Step Guide Using Minikube
To get hands-on experience with Kubernetes, you can set up a local cluster using Minikube. Minikube is a tool that runs a single-node Kubernetes cluster on your local machine, making it an excellent choice for learning and development.
Prerequisites
- A container runtime like Docker, Podman, or VirtualBox installed.
kubectl, the Kubernetes command-line tool, installed.
Step 1: Install Minikube
Follow the official Minikube installation guide for your operating system. For example, on macOS with Homebrew:
brew install minikubeStep 2: Start the Minikube Cluster
Once Minikube is installed, you can start your local Kubernetes cluster with a single command:
minikube startThis command will download the necessary components and start a single-node Kubernetes cluster. You can verify the status of your cluster with:
minikube statusStep 3: Interact with Your Cluster
With your cluster running, you can use kubectl to interact with it. For example, to get the list of nodes in your cluster:
kubectl get nodesYou should see a single node with the status Ready. You can also use the Minikube dashboard for a web-based UI:
minikube dashboardThis will open the Kubernetes dashboard in your default web browser, providing a visual overview of your cluster’s resources.
Deploying an Application: A Practical Example
Let’s deploy a simple Nginx web server to our Minikube cluster to see Kubernetes in action.
Step 1: Create a Deployment
Create a file named nginx-deployment.yaml with the following content:
apiVersion: apps/v1
kind: Deployment
metadata:
  name: nginx-deployment
spec:
  replicas: 2
  selector:
    matchLabels:
      app: nginx
  template:
    metadata:
      labels:
        app: nginx
    spec:
      containers:
      - name: nginx
        image: nginx:1.21.6
        ports:
        - containerPort: 80
This YAML file defines a Deployment named nginx-deployment that will create two replicas of a Pod running the Nginx container. Apply this configuration to your cluster:
kubectl apply -f nginx-deployment.yamlYou can check the status of your Deployment and Pods with:
kubectl get deployments
kubectl get pods
Step 2: Expose the Deployment with a Service
To access our Nginx application from outside the cluster, we need to create a Service. Create a file named nginx-service.yaml:
apiVersion: v1
kind: Service
metadata:
  name: nginx-service
spec:
  selector:
    app: nginx
  ports:
    - protocol: TCP
      port: 80
      targetPort: 80
  type: NodePort
This YAML file defines a Service of type NodePort that will expose the Nginx application on a static port on the Minikube node. Apply this configuration:
kubectl apply -f nginx-service.yamlStep 3: Access the Application
To get the URL of your Nginx application, run:
minikube service nginx-serviceThis command will open the Nginx welcome page in your browser. You have now successfully deployed and exposed an application on your local Kubernetes cluster.
Best Practices
As you move from learning to production, it’s crucial to follow best practices to ensure your Kubernetes deployments are secure, reliable, and efficient.
Health Checks
Kubernetes provides two types of health checks (probes) to monitor the health of your Pods:
- Liveness Probes: These probes check if a container is still running. If a liveness probe fails, Kubernetes will restart the container.
- Readiness Probes: These probes check if a container is ready to accept traffic. If a readiness probe fails, Kubernetes will remove the Pod from the Service’s endpoints, preventing it from receiving traffic.
Configuring health checks is essential for building resilient applications that can automatically recover from failures.
Resource Management
To ensure fair resource allocation and prevent resource contention, you should define resource requests and limits for your containers. Resource requests specify the minimum amount of CPU and memory a container needs, while resource limits define the maximum amount it can consume. Setting these values helps Kubernetes make better scheduling decisions and prevents a single container from consuming all the resources on a node.
Security
Securing your Kubernetes cluster is a multi-faceted task. Some key security best practices include:
- Role-Based Access Control (RBAC): Use RBAC to control who can access the Kubernetes API and what actions they can perform.
- Pod Security Policies: Enforce security policies on Pods, such as preventing them from running as root or accessing the host filesystem.
- Network Policies: Control the flow of traffic between Pods using network policies.
- Secrets Management: Use Kubernetes Secrets to store sensitive information like passwords and API keys, rather than hardcoding them in your application code or container images.
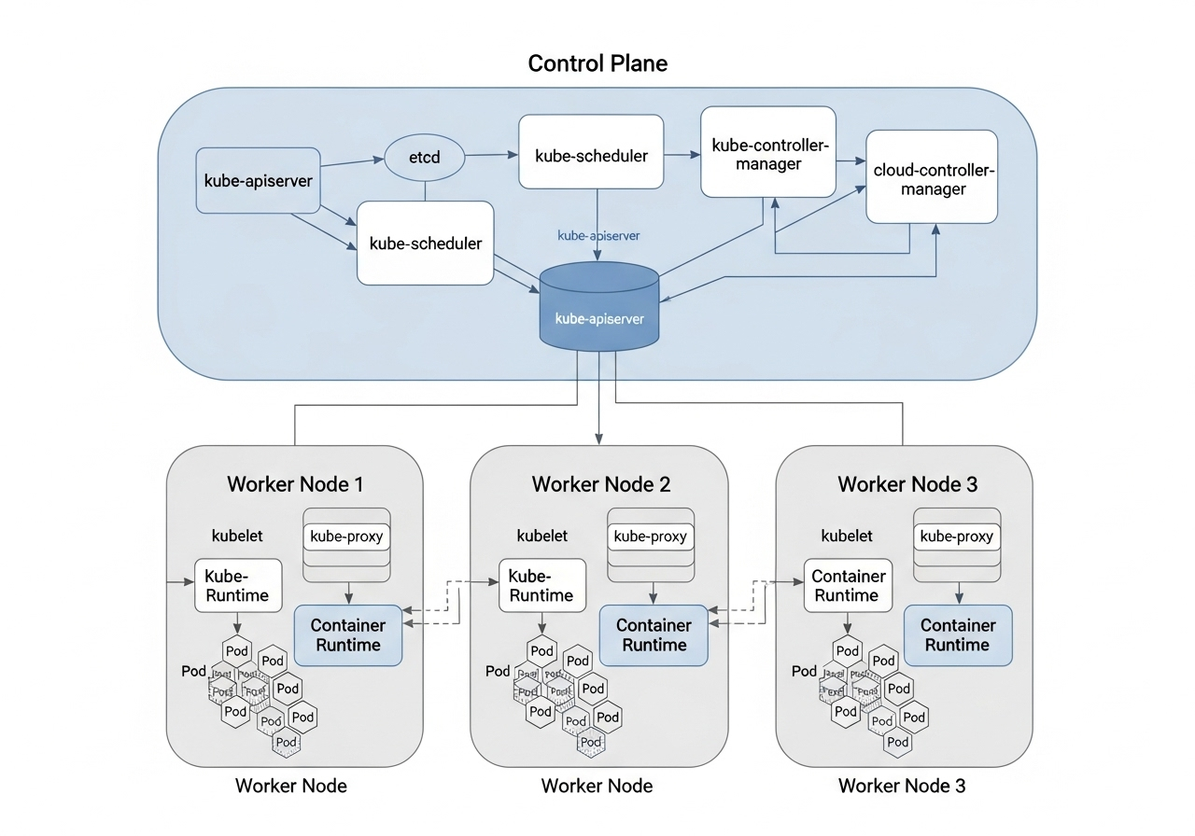
Diagram: The Architecture of a Kubernetes Cluster
To visualize how all these components fit together, here is a diagram of a typical Kubernetes cluster architecture:
This diagram illustrates the relationship between the control plane and worker nodes. The control plane, which includes components like the API server, scheduler, and controller manager, is responsible for managing the overall state of the cluster. The worker nodes are where your applications run, with each node containing a kubelet (which communicates with the control plane), a container runtime, and your application Pods.
Conclusion: The Power of Kubernetes in Modern Infrastructure
Kubernetes has revolutionized how we build, deploy, and manage applications in the cloud. Its powerful orchestration capabilities, combined with a vibrant open-source community and a rich ecosystem of tools, have made it the cornerstone of modern cloud-native infrastructure. By abstracting away the complexities of managing distributed systems, Kubernetes empowers developers to build scalable, resilient, and portable applications with greater ease and efficiency.
While the learning curve for Kubernetes can be steep, the benefits it offers in terms of automation, scalability, and reliability are undeniable. Whether you are a developer, a DevOps engineer, or an IT professional, understanding Kubernetes is becoming increasingly essential in today’s technology landscape. By mastering its core concepts and best practices, you can unlock the full potential of container orchestration and build the next generation of cloud-native applications.
Discussion
Loading comments...